Before you can start crocheting, you need to get the yarn onto the hook. The most common method is to create a crochet slip knot. The slip knot is an adjustable loop or starting knot for pretty much any crochet project you make. Making a slip knot is easy and you will use it to begin the majority of your crochet makes.
There are a number of ways of creating a slip knot, but I find the easiest method is to use your fingers.
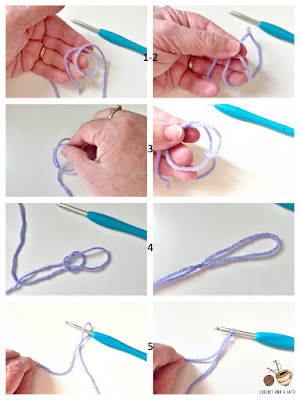
Creating a Slip Knot
- start with the tail end of the yarn and pull around 15cm from the ball
- make a loop - note that the yarn attached to the ball should be at the front
- put your fingers through this loop, grab the yarn and pull back through the loop to create another loop
- while holding this loop, pull the two strands of yarn to tighten the knot, therefore creating the slip knot.
- finally you put the loop over your crochet hook and pull the yarn attached to the ball so that the loop tightens (but not too tight) around the shaft of the hook. Note: that the yarn is worked from the shaft of the hook, not the hook itself.
You will notice that if you pull the yarn attached to the ball, the loop will get tighter, while if you pull the tail end, the loop will get looser.
If you make a mistake, or your slip knot isn't right, you can easily undo the slip knot by pulling both yarn ends, and start again.
The starting slip knot is never counted as a stitch.
Once you have a slip knot on your hook, you are ready to start chaining.
Creating a Chain Stitch
Almost every crochet project begins with a chain. After making a slip knot, the next step is to create a series of chain stitches, The chain stitches form the foundation on which you build your project. They are therefore one of the essential stitches that every crocheter needs to be able to do.
The abbreviation for chain stitch is CH
Step 1: Hold the yarn in your non-working hand, and the hook in your working (dominant) hand
Step 2: Bring the hook under and yarn over to catch the yarn. This is referred to as yarn over (yo)
Step 3: Turn the hook so it faces downwards. Holding the base of the slip knot, with your thumb and index finger, pull the yarn through the loop on the hook to form the first chain
Step 4: continue making additional chain stitches (following the above steps) as required, or as indicated in your pattern.
Note: The loop around the hook is never counted as a stitch. Your chains should be uniform in size.
TIP: It is easier to pull the yarn through the loop if the hook is turned slightly downward. Hold the hook stable in your fingers, while moving at the wrist.
Practice makes perfect!


Post a Comment
We love hearing from you ...